0. 들어가기 backend는 Spring bootProject
└─── Spring Boot (backend)
│ │ pom.xml
│ │ ...
│ └─── src
│ └─── main
│ │ ...
│
└─── Angular2 (frontend)
│ package.json
│ .angular-cli .json
│ ...
지금 프로젝트는 위에 구성과 같이 되어 있어서 spring boot 프로젝트 하나 angular ui 프로젝트 하나를 따로 만들어서 배포시 angular ui 빌드가 완료되면 해당 리소스를 backend서버 resource static 경로에 복사 한 후 다시 backend서버 쪽을 빌드를 하는 과정을 거쳐야 합니다.
물론 jenkins를 이용하면 쉽게도 빌드가 되겠지만 backend와 frontend를 동시에 개발해야 하는 경우에는 하나의 git 형상관리로 feature를 관리하고 싶은 욕심이 생겨 아래와 같은 삽질을 시작하게 되었습니다.
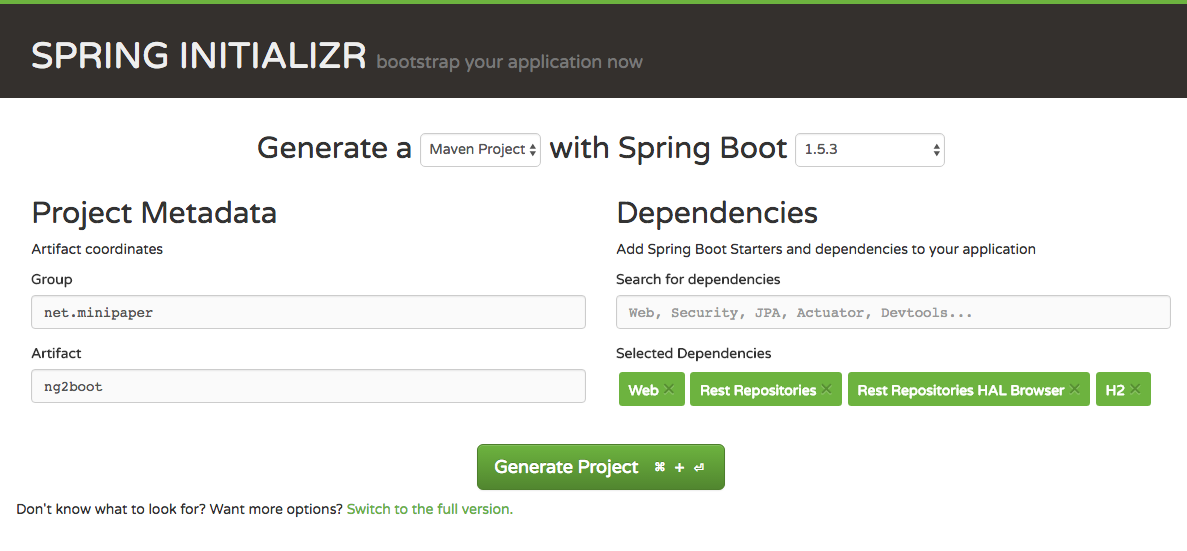
1. Spring Boot project 생성하기 https://start.spring.io 를 이용해서 생성을 합니다.Web 을 추가합니다. 더 필요한 것들은 추가로 선택합니다.
2. 프로젝트를 모듈로 분리하기 cd /workspace/ng2boot
mkdir backend
mkdir -p frontend/src/main
mv src backend
cp pom.xml backend
최상단 pom.xml 파일 편집하기 <? xml version="1.0" encoding="UTF-8" ?>
<project xmlns ="http://maven.apache.org/POM/4.0.0" xmlns:xsi ="http://www.w3.org/2001/XMLSchema-instance"
xsi:schemaLocation ="http://maven.apache.org/POM/4.0.0 http://maven.apache.org/xsd/maven-4.0.0.xsd" >
<modelVersion > 4.0.0</modelVersion >
<groupId > net.minipaper.ng2boot</groupId >
<artifactId > parent</artifactId >
<version > 0.0.1-SNAPSHOT</version >
<packaging > pom</packaging >
<name > parent</name >
<description > The ng2boot parent project</description >
<parent >
<groupId > org.springframework.boot</groupId >
<artifactId > spring-boot-starter-parent</artifactId >
<version > 1.5.3.RELEASE</version >
<relativePath />
</parent >
<properties >
<project.build.sourceEncoding > UTF-8</project.build.sourceEncoding >
<project.reporting.outputEncoding > UTF-8</project.reporting.outputEncoding >
<java.version > 1.8</java.version >
</properties >
<modules >
<module > frontend</module >
<module > backend</module >
</modules >
</project >
backend 내 pom.xml 편집 <? xml version="1.0" encoding="UTF-8" ?>
<project xmlns ="http://maven.apache.org/POM/4.0.0" xmlns:xsi ="http://www.w3.org/2001/XMLSchema-instance"
xsi:schemaLocation ="http://maven.apache.org/POM/4.0.0 http://maven.apache.org/xsd/maven-4.0.0.xsd" >
<modelVersion > 4.0.0</modelVersion >
<artifactId > backend</artifactId >
<name > backend</name >
<description > The ng2boot backend project</description >
<parent >
<groupId > net.minipaper.ng2boot</groupId >
<artifactId > parent</artifactId >
<version > 0.0.1-SNAPSHOT</version >
</parent >
<dependencies >
<dependency >
<groupId > org.springframework.boot</groupId >
<artifactId > spring-boot-starter-web</artifactId >
</dependency >
</dependencies >
<build >
<plugins >
<plugin >
<groupId > org.springframework.boot</groupId >
<artifactId > spring-boot-maven-plugin</artifactId >
</plugin >
</plugins >
</build >
</project >
backend pom.xml 파일 frontend pom.xml로 복사해서 편집 <? xml version="1.0" encoding="UTF-8" ?>
<project xmlns ="http://maven.apache.org/POM/4.0.0" xmlns:xsi ="http://www.w3.org/2001/XMLSchema-instance"
xsi:schemaLocation ="http://maven.apache.org/POM/4.0.0 http://maven.apache.org/xsd/maven-4.0.0.xsd" >
<modelVersion > 4.0.0</modelVersion >
<artifactId > frontend</artifactId >
<name > frontend</name >
<description > The ng2boot frontend project</description >
<parent >
<groupId > net.minipaper.ng2boot</groupId >
<artifactId > parent</artifactId >
<version > 0.0.1-SNAPSHOT</version >
</parent >
<build >
<plugins >
</plugins >
</build >
</project >
3. Angular2 프로젝트에 추가하기 angular-cli가 설치되어있지 않다면 npm을 통해서 설치를 합니다.
npm install -g @angular /cli
frontend/src/main 경로로 이동합니다.--skip-git 옵션을 이용해서 git repository생성을 하지 않습니다.
cd ~/workspace/ng2boot/frontend/src/main
ng new --skip-git --directory frontend ng2boot
참고로 메이븐 빌드시에 소스파일들과 node_modules 소스들이 jar 패키징에 들어가는걸 예방하기위해src/main/frontend 경로를 사용했습니다.
4. 메이븐 빌드를 위한 Angular2 설정하기 메이븐에서 angular2를 빌드하기 위해서 frontend-maven-plugin 를 사용할 것입니다.
frontend의 pom.xml 파일안에 plugins에 아래 내용을 추가합니다.<plugins>
<plugin>
<groupId> com.github.eirslett</groupId>
<artifactId> frontend-maven-plugin</artifactId>
<version> 1.3 </version>
<configuration>
<nodeVersion> v6.10 .1 </nodeVersion> o
<npmVersion> 4.4 .1 </npmVersion>
<workingDirectory> src/main/ frontend</workingDirectory>
</configuration>
<executions>
<execution>
<id> install node and npm</id>
<goals>
<goal> install-node-and-npm</goal>
</goals>
</execution>
<execution>
<id> npm install</id>
<goals>
<goal> npm</goal>
</goals>
</execution>
<execution>
<id> npm run build</id>
<goals>
<goal> npm</goal>
</goals>
<configuration>
<arguments> run build</arguments>
</configuration>
</execution>
</executions>
</plugin>
</plugins>
사용할 node 버전과 npm 버전을 작성해주시면 됩니다.
빌드를 할 때 형상관리가 필요하지 않은 파일들이 있기 때문에 root경로에 .gitignore파일 가장 아래에 다음 내용을 추가해 줍니다.### Frontend ###
frontend/src/main/frontend/node/
frontend/src/main/frontend/node_modules/
그리고 기본적으로 angular-cli는 src\main\frontend\dist에 빌드를 하기 때문에 메이븐 레이아웃에 맞게 변경해 줍니다.
.angular-cli.json내에 outDir 속성을 변경해 줍니다."apps" : [
{
"root" : "src" ,
"outDir" : "../../../target/frontend" ,
"assets" : [
"assets" ,
"favicon.ico"
],
"index" : "index.html" ,
"main" : "main.ts" ,
"polyfills" : "polyfills.ts" ,
"test" : "test.ts" ,
"tsconfig" : "tsconfig.app.json" ,
"testTsconfig" : "tsconfig.spec.json" ,
"prefix" : "app" ,
"styles" : [
"styles.css"
],
"scripts" : [],
"environmentSource" : "environments/environment.ts" ,
"environments" : {
"dev" : "environments/environment.ts" ,
"prod" : "environments/environment.prod.ts"
}
}
]
5. Spring boot static 리소스 경로 추가하기 스프링 부트는 Java 클래스 경로에 있는 여러 디렉토리 의 static 컨텐츠를 제공합니다.
기본으로 제공하는 디렉토리말고 angular2 빌드한 리소스 파일경로를 static 컨텐츠로 추가합니다.frontend/pom.xml 파일을 수정합니다.
</plugins >
<resources >
<resource >
<directory > target/frontend</directory >
<targetPath > static</targetPath >
</resource >
</resources >
</build >
backend/pom.xml 파일에 frontend모듈의 dependency를 추가합니다.
<dependency >
<groupId > net.minipaper.ng2boot</groupId >
<artifactId > frontend</artifactId >
<version > ${project.version} </version >
<scope > runtime</scope >
</dependency >
</dependencies >
6. 구동 해봅시다. cd ~/workspace/ng2boot
./mvnw clean package
아래와 같이 빌드 로그들이 나옵니다../mvnw clean package
/Users/minipaper/workspace/ng2boot
[INFO] Scanning for projects...
[INFO] ------------------------------------------------------------------------
[INFO] Reactor Build Order:
[INFO]
[INFO] parent
[INFO] frontend
[INFO] backend
[INFO]
[INFO] ------------------------------------------------------------------------
[INFO] Building parent 0.0 .1 -SNAPSHOT
[INFO] ------------------------------------------------------------------------
[INFO]
[INFO] --- maven-clean-plugin:2.6 .1 :clean (default-clean) @ parent ---
[INFO]
[INFO] ------------------------------------------------------------------------
[INFO] Building frontend 0.0 .1 -SNAPSHOT
[INFO] ------------------------------------------------------------------------
[INFO]
[INFO] ------------------------------------------------------------------------
[INFO] Reactor Summary:
[INFO]
[INFO] parent ............................................. SUCCESS [ 0.249 s]
[INFO] frontend ........................................... SUCCESS [ 25.668 s]
[INFO] backend ............................................ SUCCESS [ 11.530 s]
[INFO] ------------------------------------------------------------------------
[INFO] BUILD SUCCESS
[INFO] ------------------------------------------------------------------------
[INFO] Total time: 38.072 s
[INFO] Finished at: 2017 -05 -02 T00:39 :11 +09 :00
[INFO] Final Memory: 34 M/308 M
[INFO] ------------------------------------------------------------------------
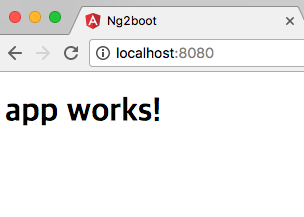
빌드가 성공했으니 jar 파일을 run 해보겠습니다.java -jar backend/target/backend-0.0 .1 -SNAPSHOT.jar
http://localhost:8080 으로 접속하면 화면이 나옵니다.
7. 개발팁 angular-cli를 이용해 ng serve를 통해 개발을 하면 포트가 backend 서버랑 달라 Same Origin Policy정책 위반으로 request 요청을 하지 않게 됩니다.
ng2boot/frontend/src/main/frontend 경로에 proxy.conf.json 파일을 생성하고 아래와 같이 입력합니다. /api로 시작하는 경로는 모두 아래와 같은 타겟에 전달합니다.
{
"/api" : {
"target" : "http://localhost:8080" ,
"secure" : false
}
}
그리고 package.json의 start 명령어에 --proxy-config 옵션을 추가합니다."scripts" : {
"ng" : "ng" ,
"start" : "ng serve --proxy-config proxy.conf.json" ,
"build" : "ng build" ,
"test" : "ng test" ,
"lint" : "ng lint" ,
"e2e" : "ng e2e"
}
서버는 backend 디렉토리에서 mvn spring-boot:run으로 구동하고 frontend는 frontend\src\main\frontend 경로에서 npm run start을 통해 http://localhost:4200 에서 backend와 분리시켜 개발을 진행하면 됩니다.
8. 참고 github 에서도 볼 수 있습니다.
참고 사이트scaffold
Related Posts
No related post.